We like to pretend there are two disjointed end-to-end test types: API and browser automation tests. And that the tools used are very different; the API tests are executed by a CLI test runner, while automation tests all fire up a browser. Yet, a good E2E automation test runner, in my opinion, should be really good at working with a remote server API via HTTP. After all, this is what every useful website does. Every website exchanges data with remote servers through HTTP requests.
What if the same tool could do both tasks very well? What if the same tool could exercise the feature of your TodoMVC web application, and could test your server’s API to make sure a server-side logical or data error has not crept up undetected?
+------------------------------+
| http://....                  |
|------------------------------|
|                              |
|                              |
|                              |
|                              |
|        web application   <--------+ Automation
|                              |      Framework
|                              |            +
|   +         +         +      |            |
|   |         |         |      |            |
|   |         |         |      |            |
+---|---------|---------|------+            |
    |         |         |                   |
    |         |         |                   |
    |         |         | XHR requests      |
    |         |         |                   |
+---|---------|---------|------+            |
|   |         |         |      |            |
|   |         |         |    <--------------+
|   v         v         v      |
|        Server API            |
+------------------------------+
A good automation framework can in such case deliver a “killer feature” - a smart, sensible GUI that allows the user to interact with the data flowing from the test runner to the server and back. Do not underestimate the power of coming back to each individual test to inspect a response, for example, to see what data the server has returned, and what the headers were.
This is why graphical REST clients like Postman and Insomnia are so popular - they allow one to run a query, but come back to it later to inspect and modify.
Yet, Postman is great at exploring an API, but its “test runner” implementation, cleverly named Newman is a GUI-less CLI test runner; similar to the supertest test runner for example. Here is what an example API test looks like using supertest. Notice the fluent API, chaining each assertion and operation to the result yielded from the previous step.
const request = require('http://localhost:5555')
request(app)
  .get('/user')
  .expect('Content-Type', /json/)
  .expect('Content-Length', '15')
  .expect(200, {
    name: 'Joe',
    age: 33
  });
So we either have a GUI interface to explore and play with individual requests, or a CLI test runner. Why can’t we have both?
Enter Cypress Test Runner. It is an end-to-end testing tool geared towards web application testing. But, thanks to its extensive API, it can easily exercise any HTTP API. In particular, we can take advantage of the built-in method cy.request() to interact with the server. This method is pretty flexible and is geared towards GET /url requests, but it can execute any HTTP verb.
Syntax for cy.request() command:
cy.request(url)
cy.request(url, body)
cy.request(method, url)
cy.request(method, url, body)
cy.request(options)
Test example
Let us test a simple API using Cypress to see how a graphical user interface might be useful for API tests. I have created a cypress-example-api-testing repository. We can start by cloning the repository and checking out the branch start.
$ git clone [email protected]:cypress-io/cypress-example-api-testing.git
$ cd cypress-example-api-testing
$ git checkout start
$ npm install
$ npm start
The single dependency this project installs is json-server which makes an API from the included db.json file.
{
  "todos": [
    {
      "id": 1,
      "task": "read something"
    },
    {
      "id": 2,
      "task": "write something"
    }
  ]
}
This JSON file defines a single end point /todos with two items.
We can interact with the API from the command line using Curl or from a GUI client like Postman. The endpoint is simple enough; get either all todos or a single one by id.
$ curl http://localhost:3000/todos
[
  {
    "id": 1,
    "task": "read something"
  },
  {
    "id": 2,
    "task": "write something"
  }
]
$ curl http://localhost:3000/todos/1
{
  "id": 1,
  "task": "read something"
}
First test
Let us test this API using Cypress. First, let us confirm that we are getting a JSON response from the GET /todos call. We can install Cypress, write our first test, and be up and testing in less than 1 minute. I placed the test code in the branch first-test if you want to check it out.
$ npm install --save-dev cypress
> node index.js --exec install

Installing Cypress (version: 1.0.2)

 ✔  Downloaded Cypress
 ✔  Unzipped Cypress
 ✔  Finished Installation /node_modules/cypress/dist/Cypress.app

You can now open Cypress by running: node_modules/.bin/cypress open

https://on.cypress.io/installing-cypress
I replaced the contents of cypress/integration/example_spec.js with the following single test case.
/* eslint-env mocha */
describe('todos API', () => {
  it('returns JSON', () => {
    cy.request('http://localhost:3000/todos')
      .its('headers')
      .its('content-type')
      .should('include', 'application/json')
  })
})
Notice how much this test looks like a regular API test. Yet, if you start json-server and fire up Cypress you get a fully featured graphical Test Runner, including a step-by-step test reporter column where you can inspect each intermediate value! The test reporter is the left column of the screenshot below.
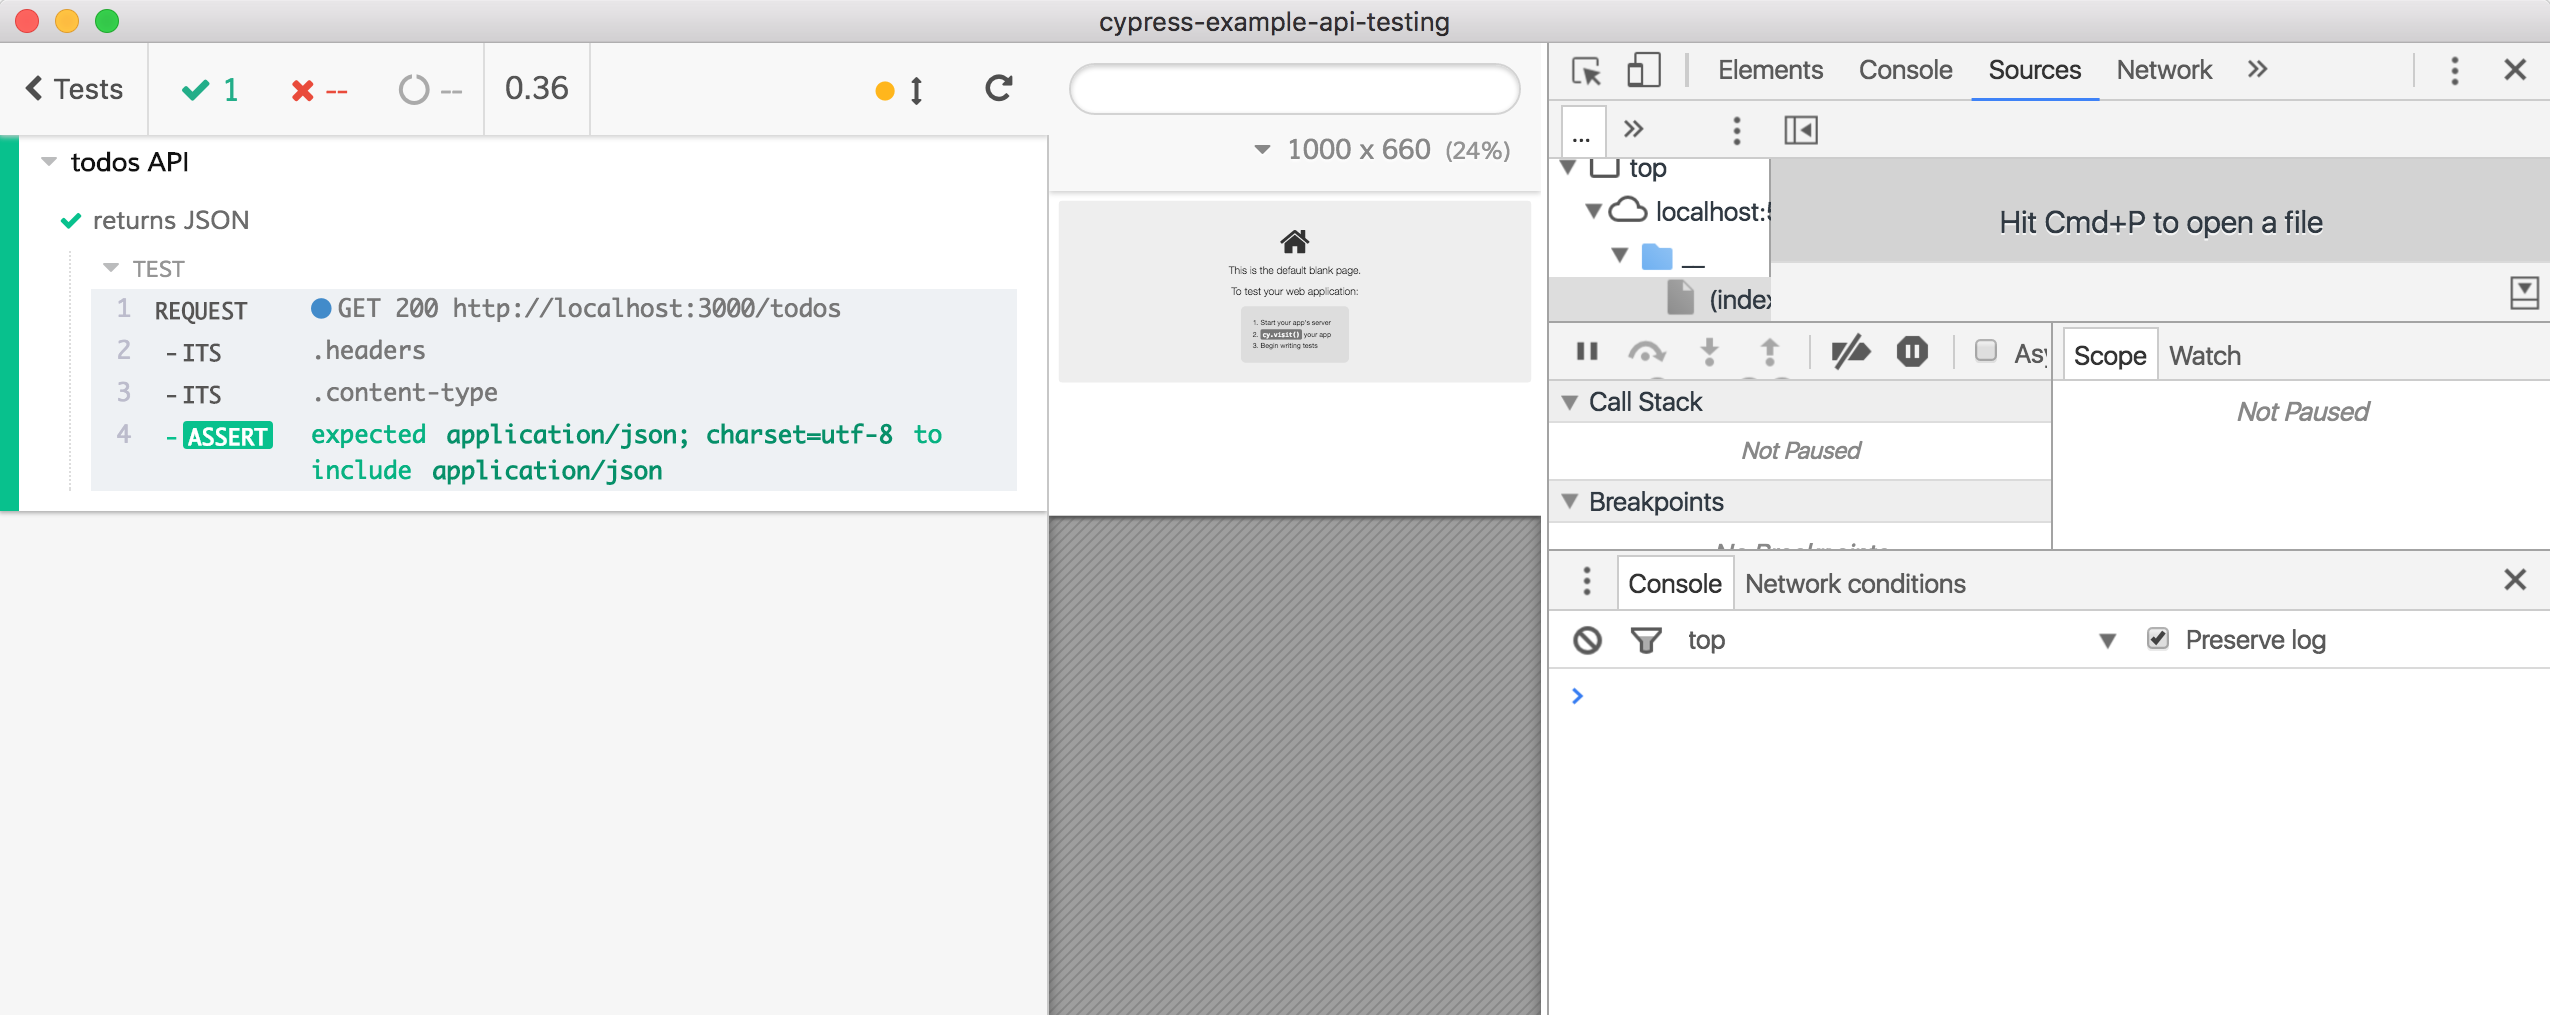
Each step of the test’s fluent API has its own row in the reporter. Since there is no web application to show, we can open the DevTools and let it take as much window space as possible,
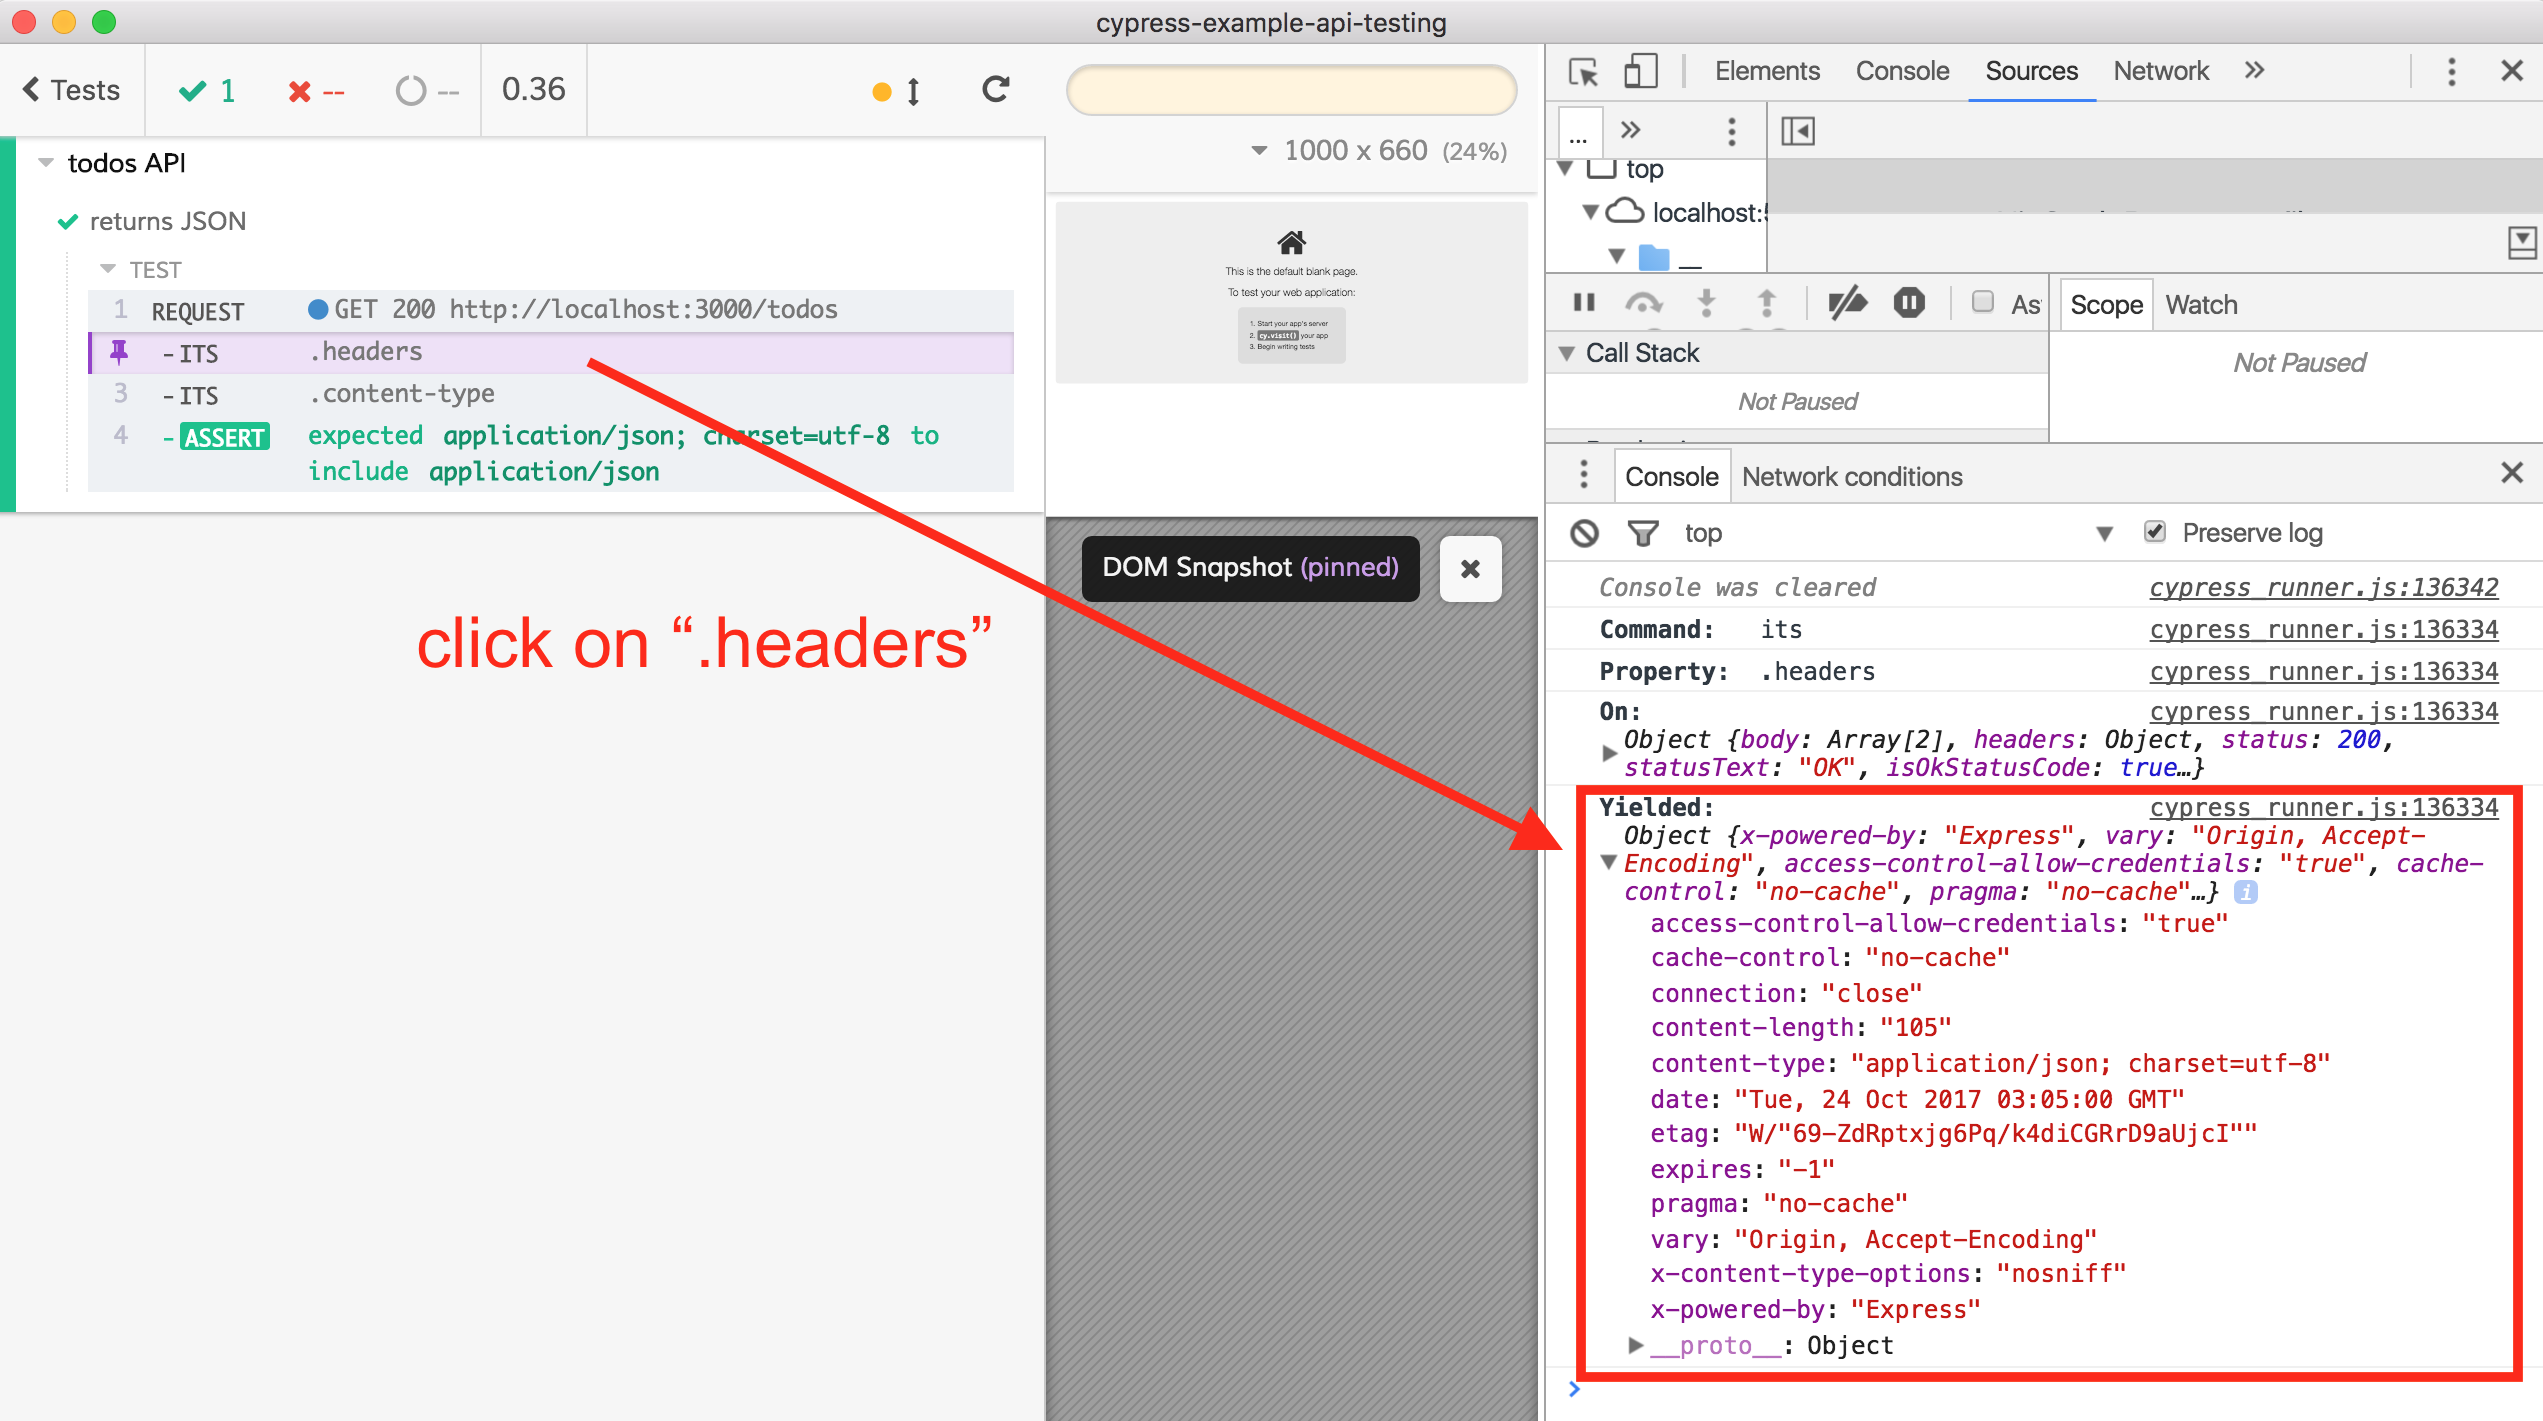
minimizing the part of the GUI that normally shows the website under test. Now click on any test step, for example on ITS .headers row, which corresponds to .its('headers') test command. The DevTools will show the result of this method call during the test. Here is the beauty of a test runner with a GUI - it allows you to go back and inspect each intermediate value without littering your tests with many log statements, and without rerunning the tests.
Let us make sure we are getting two “Todo” items initially. We are going to treat each test as an independent execution to avoid any interdependencies among tests. In a sense our tests will be very similar to well-isolated unit tests; each test will start from scratch by destroying the browser window and any local state - this is what Cypress does by default for you. So our second test will look a lot like our first one, but instead of headers, we are going to grab the data from the response.
/* eslint-env mocha */
describe('todos API', () => {
  it('returns JSON', () => {
    cy.request('http://localhost:3000/todos')
      .its('headers')
      .its('content-type')
      .should('include', 'application/json')
  })

  it('loads 2 items', () => {
    cy.request('http://localhost:3000/todos')
      .its('body')
      .should('have.length', 2)
  })
})
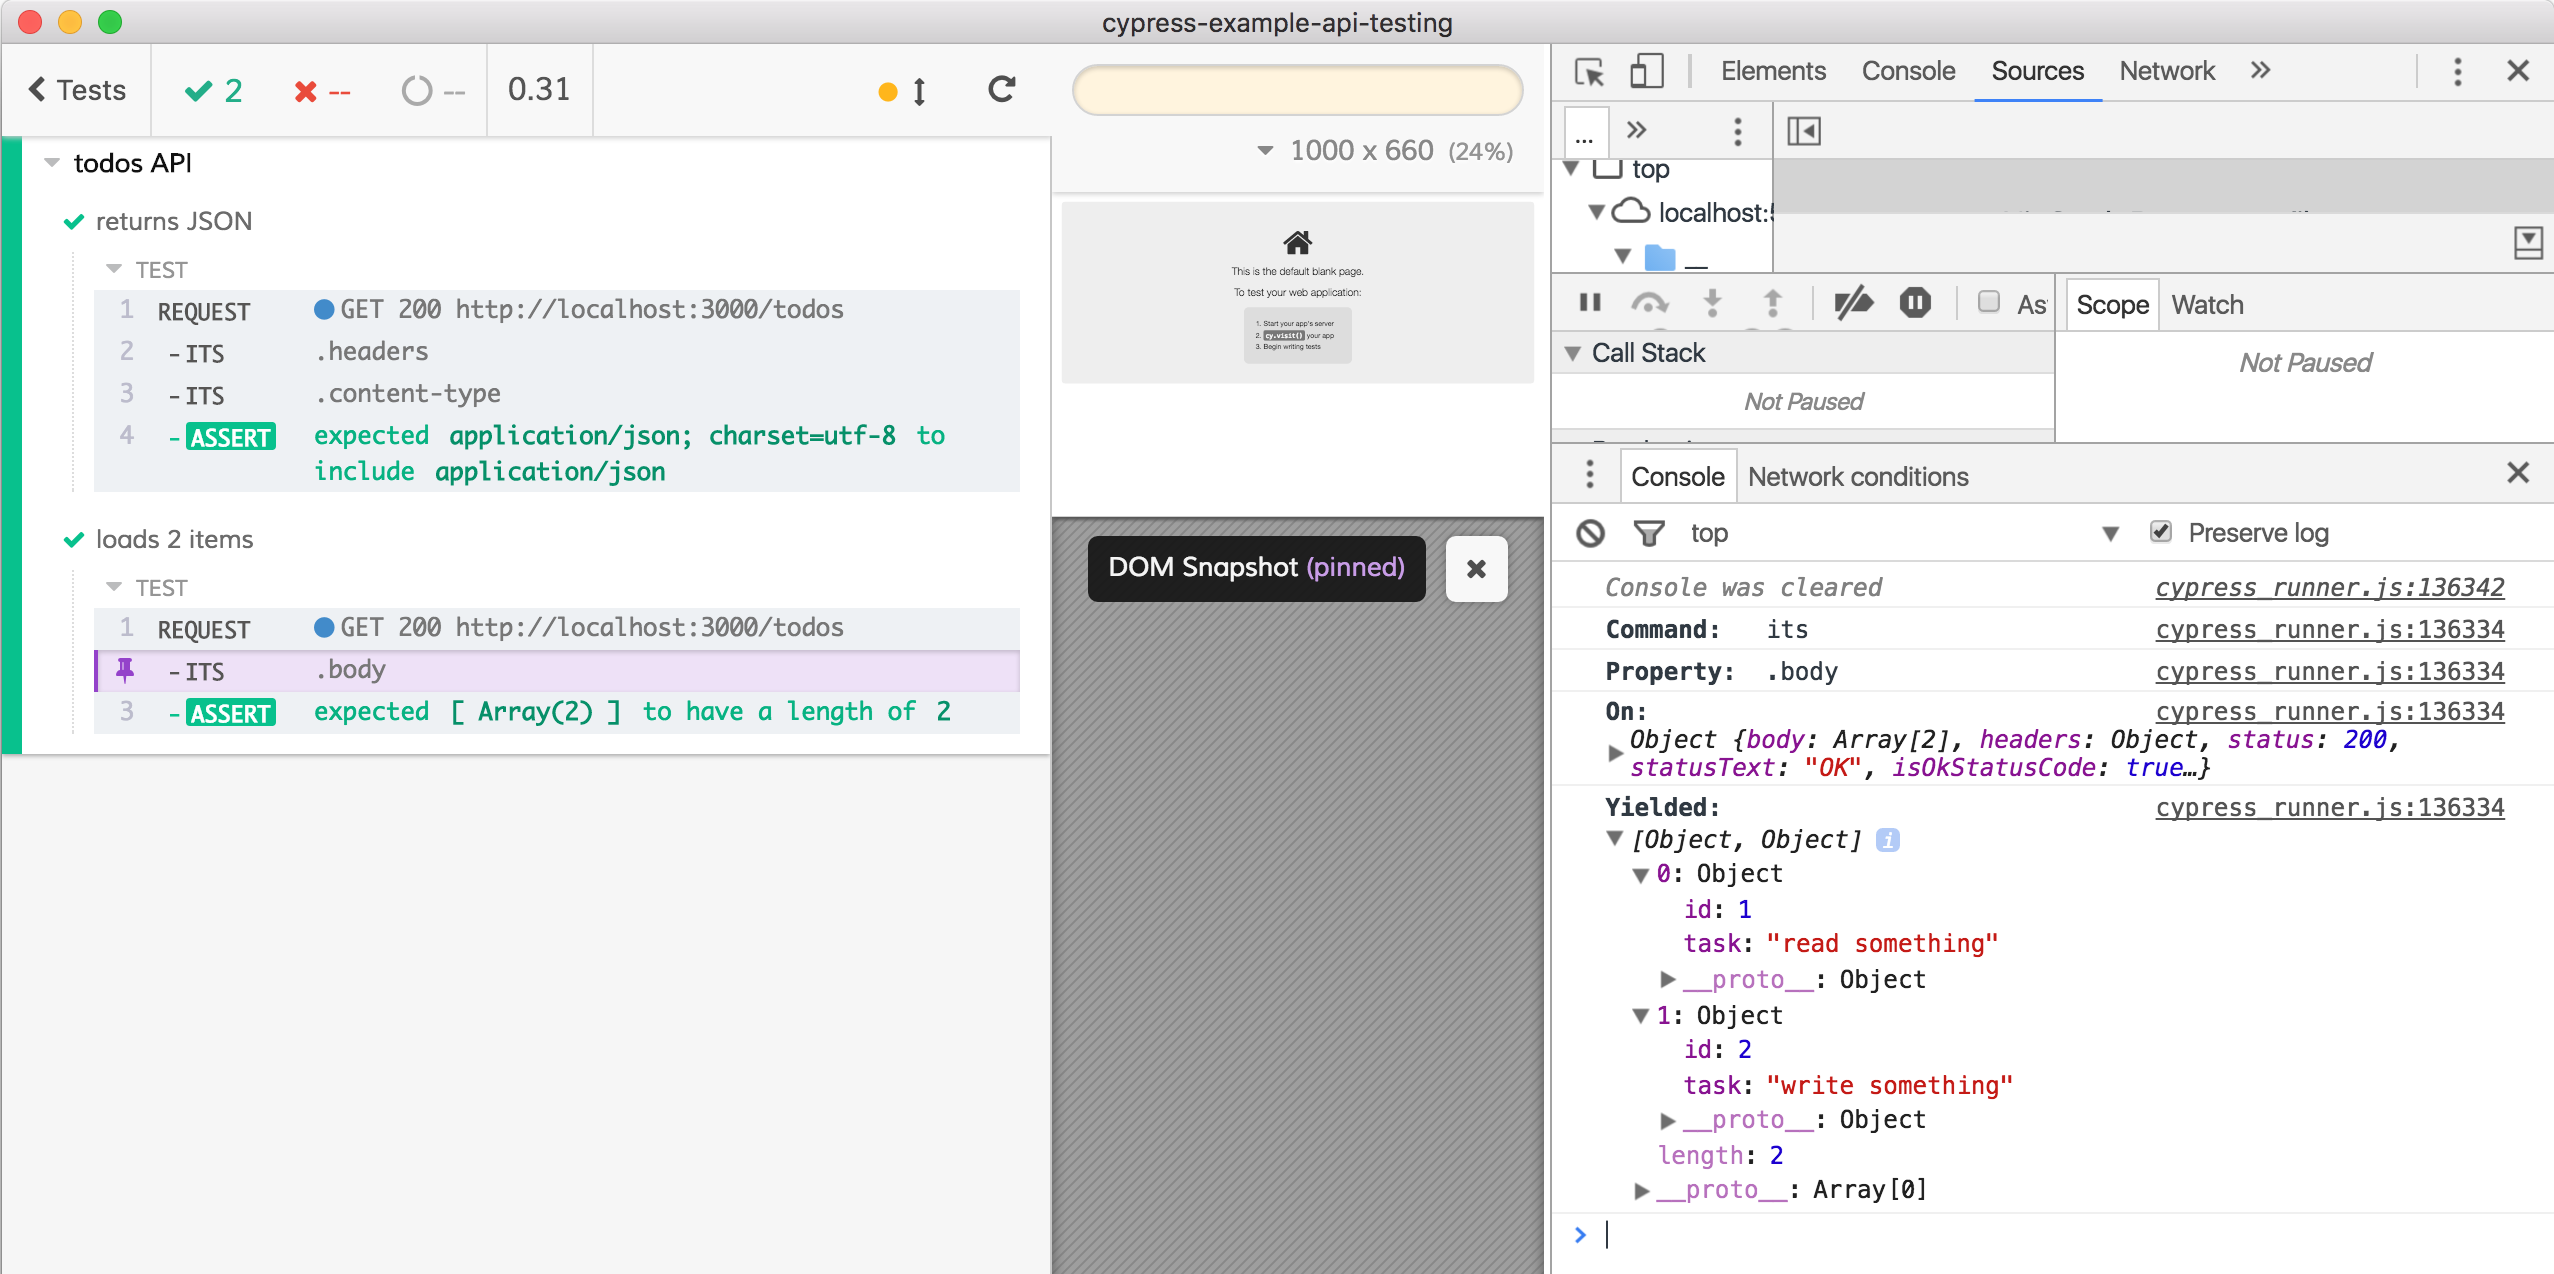
There are a lot of assertions included in Cypress, in our case we are using .should('have.length', 2) to check if the object yielded from the previous step is an Array with two elements. We can even inspect the elements by clicking on the .its('body') step.
In the above code we have duplicate urls in both tests. Let us make the code less brittle by moving the domain part of the url into the cypress.json file.
{
  "baseUrl": "http://localhost:3000"
}
/* eslint-env mocha */
describe('todos API', () => {
  it('returns JSON', () => {
    cy.request('/todos')
      .its('headers')
      .its('content-type')
      .should('include', 'application/json')
  })

  it('loads 2 items', () => {
    cy.request('/todos')
      .its('body')
      .should('have.length', 2)
  })
})
Not only does this make the tests less fragile, we can also point these tests to a different server through command line arguments or environment variables when running Cypress. This makes it extremely simple to test code as it moves through various environments.
Idempotent tests
We can come up with a few more tests that do not modify the server state; that is the tests are read-only. For simplicity we can write a few utility functions - our test runner is fully capable of running any modern JavaScript, after all!
/* eslint-env mocha */
describe('todos API', () => {
  const initialItems = [
    {
      "id": 1,
      "task": "read something"
    },
    {
      "id": 2,
      "task": "write something"
    }
  ]

  const getItems = () =>
    cy.request('/todos')
      .its('body')

  it('returns JSON', () => {
    cy.request('/todos')
      .its('headers')
      .its('content-type')
      .should('include', 'application/json')
  })

  it('loads 2 items', () => {
    getItems()
      .should('have.length', 2)
  })

  it('loads the initial items', () => {
    getItems()
      .should('deep.eq', initialItems)
  })

  it('returns id + task objects', () => {
    getItems()
      .each(value =>
        expect(value).to.have.all.keys('id', 'task')
      )
  })
})
In the additional two tests we have verified the entire initial array, and the schema for each object. You can find this code in branch idempotent of the repo.
Resetting server state
But what if we want to add or delete “Todo” items on the server?
We need to reset the server state (and hope that there is just a single test runner at a time!) The best place for resetting the server is before each test - remember, we need to make each test as independent from other tests as possible. I will add a reset utility function, where all existing todo items will be deleted, and the initial todos are added.
const getItems = () =>
  cy.request('/todos')
    .its('body')

const add = item =>
  cy.request('POST', '/todos', item)

const deleteItem = item =>
  cy.request('DELETE', `/todos/${item.id}`)

const deleteAll = () =>
  getItems()
    .each(deleteItem)

const reset = () => {
  deleteAll()
  initialItems.forEach(add)
}

beforeEach(reset)
Let us test adding an item and deleting an item. In both cases, we know the changes are not going to survive the reset call.
it('adds an item', () => {
  const randomId = Cypress._.random(0, 10000)
  const item = {id:randomId, task:'life'}

  add(item)
  cy.request(`/todos/${randomId}`)
    .its('body')
    .should('deep.eq', item)
})

it('deletes an item', () => {
  const id = initialItems[0].id
  cy.request('DELETE', `/todos/${id}`)
  getItems()
    .should('have.length', 1)
})
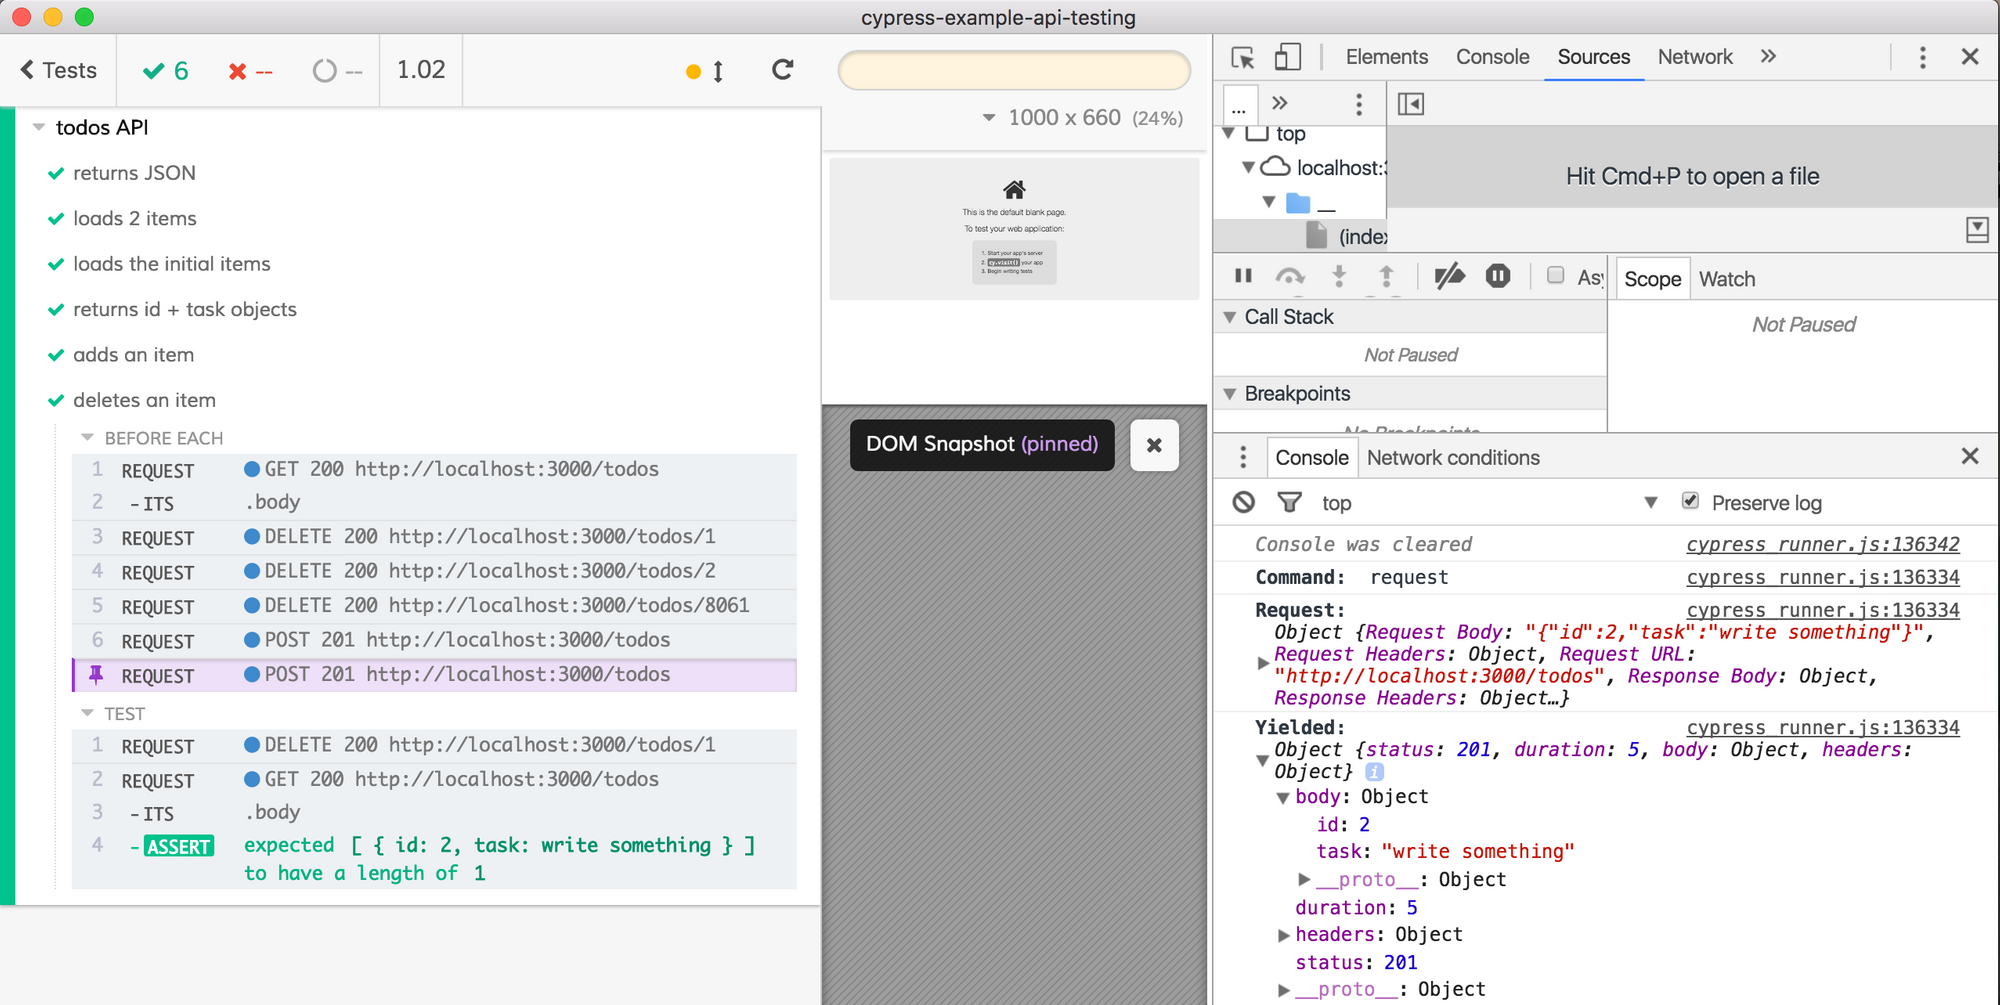
As before, you can inspect the result of each step inside the beforeEach block by clicking on the step and drilling down the objects dumped into the DevTools console. The many steps in the reset function are creating a little bit too much noise in the reporter. We can group these commands into a single custom command, if we wanted to, but even simpler is to just pass log option to each command selectively. We can pass { log: false } to the utility functions called from the reset callback, which will silence requests (but not .its() unfortunately).
const deleteItem = (item, options = { log: true }) =>
  cy.request({
    method: 'DELETE',
    url: `/todos/${item.id}`,
    log: options.log
  })

const deleteAll = () =>
  getItems()
    .each((item) => deleteItem(item, { log: false }))
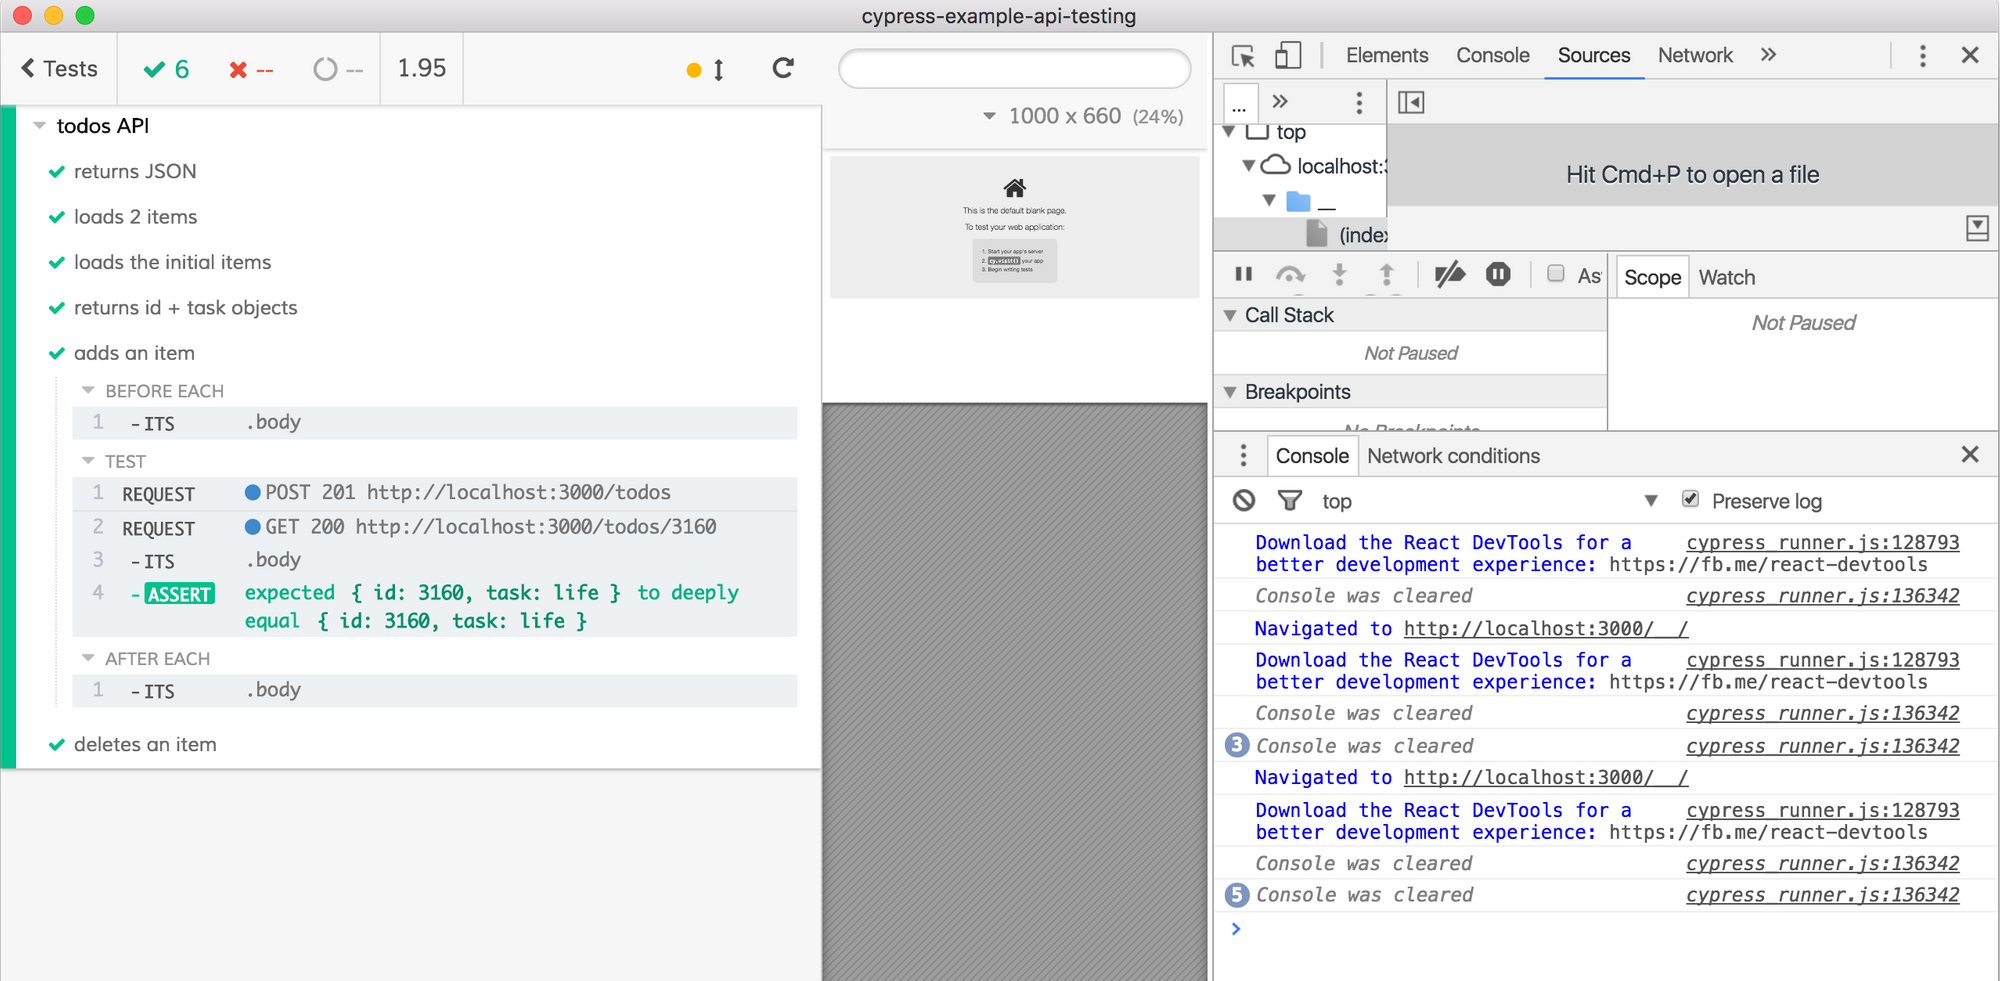
The reporter is much quieter now, but still shows each test step that matters to us.
note that we are only resetting the state before each test. We consider resetting state after a test an anti-pattern. For more information see our best practices.
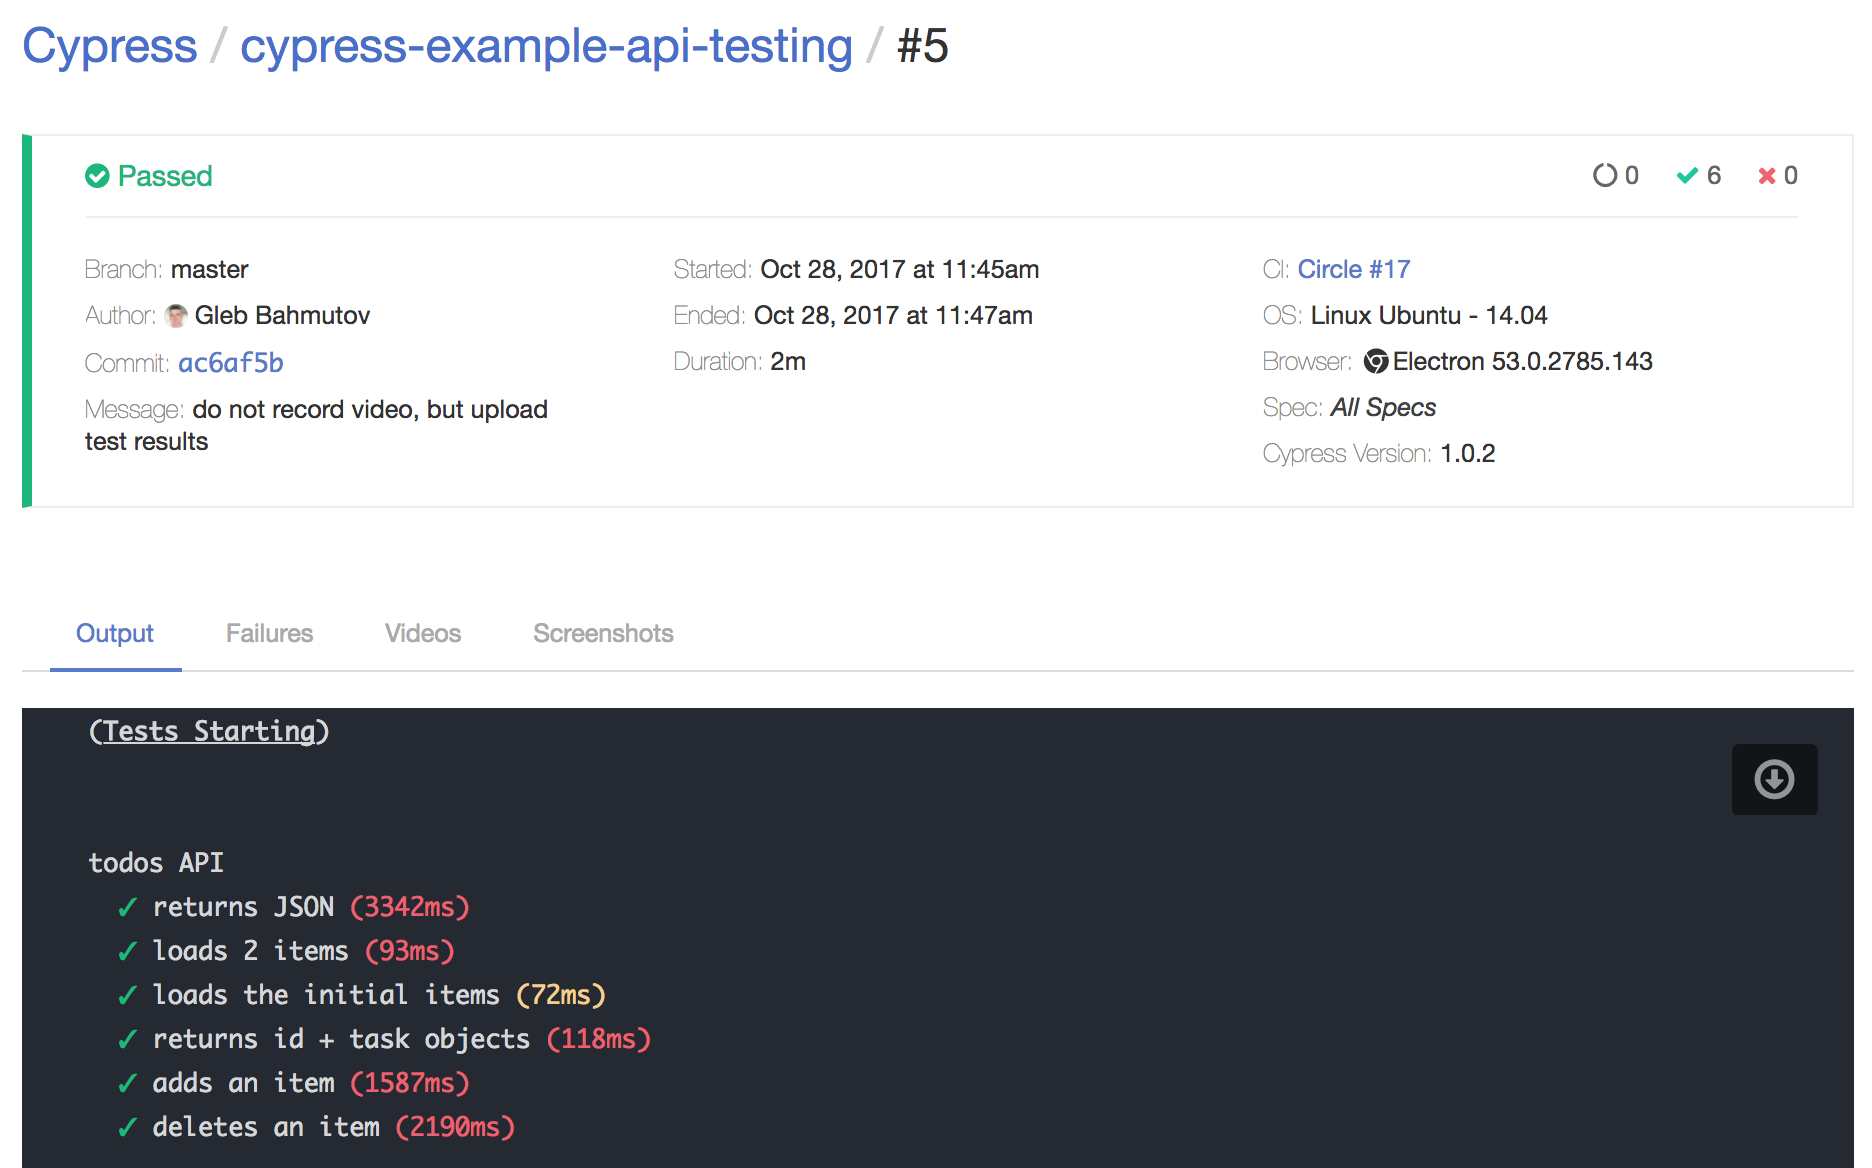
Testing on CI
Finally, we want to run the same API tests on CI, and even have a video recording of the GUI while running. Cypress comes with everything you need already built-in, including Docker images. For this demo repository I setup a CircleCI project. Here is a sample CI file circle.yml
machine:
  node:
    version: 8
test:
  override:
    - $(npm bin)/cypress verify
    - npm test
As you can see nothing complicated. The trick to starting both the json-server and the Cypress Test Runner, and shutting both down when the tests are completed is to use a CLI utility like npm-run-all that comes with a run-p command.
{
  "scripts": {
    "cy:open": "cypress open",
    "cy:run": "cypress run --record",
    "start": "json-server db.json",
    "test": "run-p --race start cy:run"
  }
}
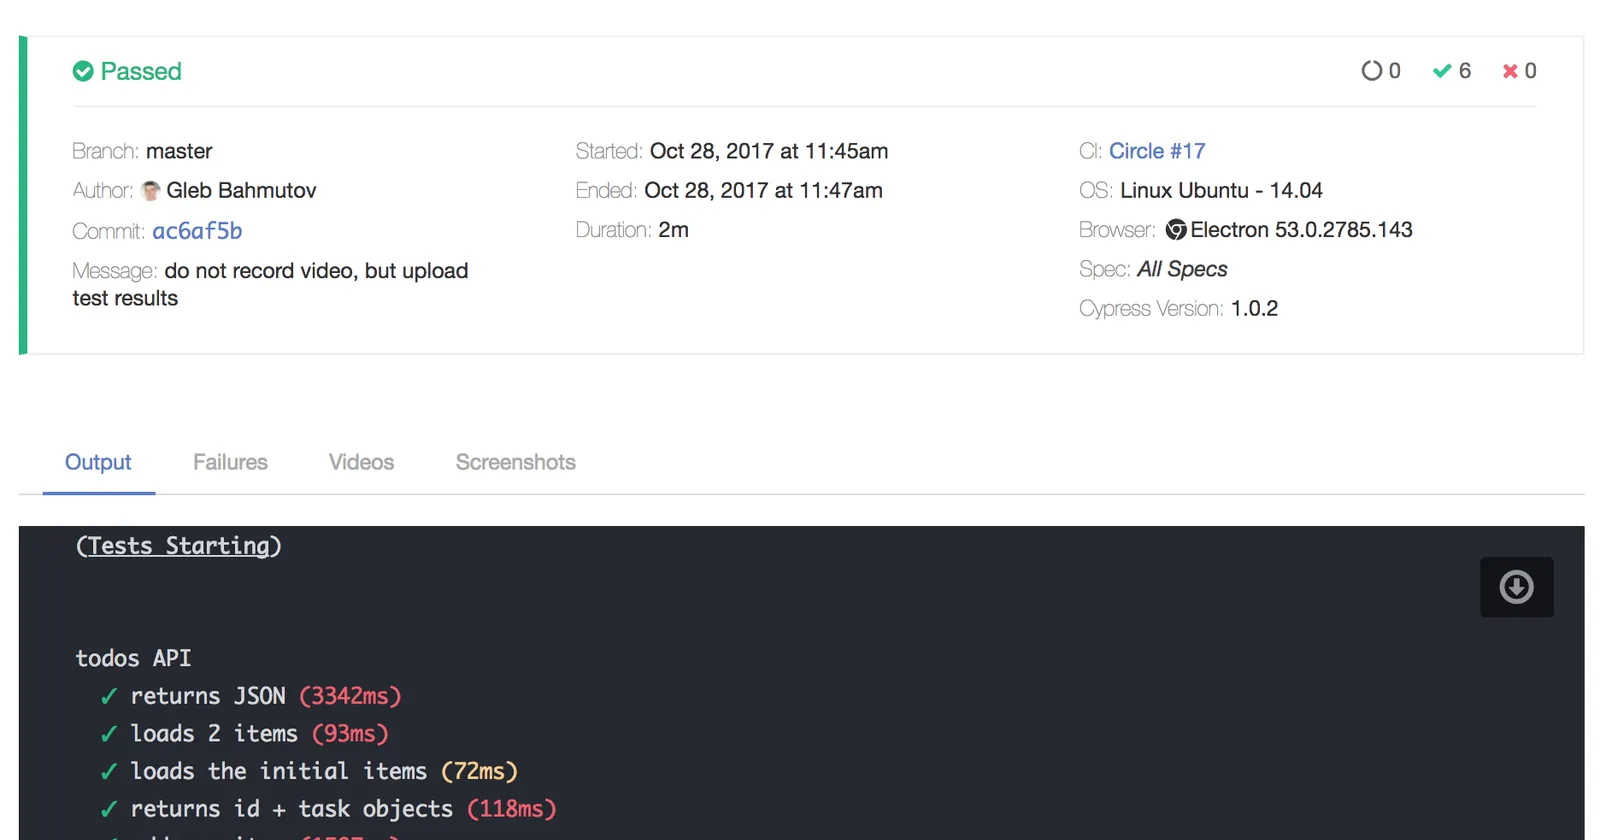
When Cypress runs on CI, it will record the video of the built-in Electron browser, and the videos and test results are available in the Cypress Dashboard Service.
Final thoughts
- A graphical user interface gives immense power to interact and inspect each result of every test step, without adding log statements and rerunning the tests.
- Using the same test runner locally and on CI ensures consistency; using the same test runner to perform API and browser automation tests transfers skills and minimizes overhead.
More information
If you like what you see, go ahead and try Cypress - it is free and open source.
- How to start.
- We have a lot of examples.
- See the source on GitHub.
- See what others are saying on Twitter about Cypress.